Why?
DNS is one of these protocols that makes the web work. Well, not only web, many other internet things that need to communicate one with another. You can think of it as a phone book for the internet. When you visit a domain, for example google.com, your computer follows a series of steps to turn the human-readable web address into a machine-readable IP address. DNS is a very old protocol, but it does have some issues and if mis-configured and not monitored, it can compromise security of your network.
DNS problem – security
DNS queries are sent in a clear text. This means that others can see and manipulate the queries and responses. Such attacks are well known, for example MITM (Man In The Middle) attacks.
Manipulating DNS is well known by many ISP’s around the world. ISPs (Internet Service Providers) can censor the web by simply blocking DNS resolution of domains and they can build a profile of all the sites you visit by recording your DNS queries.
Then there are ads. Internet is full of them. Some of them are useful and certainly add value while not being very intrusive. Unfortunately, many of them are very intrusive and often not relevant. They slow down web pages and can often be used by bad guys to get a users to click on the ad, which can redirect them to a different page containing a malicious payload.
The solutions
– DNSSEC – It helps with the integrity of DNS queries. It is a set of extensions to DNS which provide to DNS clients (resolvers) origin authentication of DNS data, authenticated denial of existence, and data integrity, but not availability or confidentiality. DNSSEC unfortunately, does not solve the privacy or censorship issue.
– DNS-over-HTTPS (DoH) – DNS over HTTPS (DoH) is a way of performing remote Domain Name System (DNS) resolution via the HTTPS protocol. The goal of the method is to increase user privacy and security by preventing eavesdropping and manipulation of DNS data by man-in-the-middle attacks.
In order to secure my DNS, I am going to be using a combination of Pi-hole and Cloudflare’s DNS resolver. Let’s dig into some details.
The Pi-hole

The Pi-hole, a ‘blackhole for internet advertisements’. It’s a DNS server you can run locally on your network. The purpose of it is to kill all DNS queries within your network for known bad domains. By default, it blacklists about 130k domains used for nasty stuff. You can increase it blocking capabilities by using additional blacklists (I recommend starting with a default installation to see how you get on before installing additional lists).
I have decided to run Pi-hole on a Raspberry Pi. I have gone ahead and purchased Raspberry Pi 3 Model B+ Official Desktop Starter Kit (model B+ has Gigabit Ethernet over USB 2.0, maximum throughput 300 Mbps as oppose to 100 Mbps on Pi 3) and Heatsink Kit For Raspberry Pi 3 to help with cooling, just in case:


Setting up the Raspberry Pi
The first thing to do is to get the latest version of Raspbian, a Debian based Linux OS designed specifically for Raspberry Pi. You can download it here. Since I am running it headless, I got a Lite version as I don’t need a desktop experience. Once downloaded you need to write it onto a MicroSD card. I highly recommend getting a high endurance MLC flash based MicroSD card such as this one, they are well worth the money in regards to reliability especially since I am planning to run it 24/7/365. I am on MacOS and I use is Etcher – nice, lightweight and free image burning tool. If you are using the Lite version in headless mode, make sure to enable SSH after writing the image to MicroSD card. Once you are done, pop MicroSD card into Raspberry Pi and power it on. Give it few minutes and you should be able to SSH into it using default credentials: pi:raspberry .
Once you are logged in, there are few basic things to do:
– run full system update: sudo apt-get update && sudo apt-get dist-upgrade . Once everything is up to to date, reboot your system sudo reboot
– change hostname: modify sudo nano /etc/hostname and sudo nano /etc/hosts files
– change default password: passwd
– setup a static IP adress by modifying dhcpcd.conf file sudo nano /etc/dhcpcd.conf . Once done, give it a reboot to ensure that everything works as desired sudo reboot
When the system has booted up and you logged back in, let’s check that we have an internet connectivity:
pi@p1:~ $ curl -I https://www.google.com
HTTP/2 200
date: Tue, 09 Oct 2018 22:15:25 GMT
expires: -1
cache-control: private, max-age=0
content-type: text/html; charset=ISO-8859-1 p3p: CP="This is not a
P3P policy! See g.co/p3phelp for more info."
server: gws
x-xss-protection: 1; mode=block
x-frame-options: SAMEORIGIN
set-cookie: 1P_JAR=2018-10-09-22; expires=Thu, 08-Nov-2018 22:15:25 GMT; path=/; domain=.google.com
set-cookie: NID=140=i5Kwvp2ji2gsfVLOeX8MOrcA89VNEBKO7CWrJxRcLuLdkuWg2_zZQMFO5TG179-_mNWTqmabjBmpvs9Bq_ISLF7ZPEa5N30-K-fhw8lwGOGD4q4nvJ7riLXSXhqDxueG; expires=Wed, 10-Apr-2019 22:15:25 GMT; path=/; domain=.google.com; HttpOnly
alt-svc: quic=":443"; ma=2592000; v="44,43,39,35"
accept-ranges: none
vary: Accept-Encoding
HTTP/2 200 means that we are ok and indeed have the internet connectivity. Let’s crack on then!
Cloudflare DNS resolver – Setting up cloudflared
Cloudflare has a great guide available here but I am only going to use DoH. All I need to do is as follows:
cd ~
wget https://bin.equinox.io/c/VdrWdbjqyF/cloudflared-stable-linux-arm.tgz
mkdir argo-tunnel
tar -xvzf cloudflared-stable-linux-arm.tgz -C ./argo-tunnel
rm cloudflared-stable-linux-arm.tgz
cd argo-tunnel
./cloudflared --version
At the time of writing this post, the latest version is cloudflared version 2018.10.2 (built 2018-10-06-1941 UTC)
We now need to start the service:
sudo ./cloudflared proxy-dns --port 54 --upstream https://1.1.1.1/.well-known/dns-query --upstream https://1.0.0.1/.well-known/dns-quer
You can verify that cloudflared running as expected with ps aux | grep dns . If everything is ok and DNS tunnel is running as expected, you should see something similar to that:
root 570 0.2 1.9 911464 18808 ? Ssl Oct08 3:23 /home/pi/argo-tunnel/cloudflared proxy-dns --port 54 --upstream https://1.1.1.1/.well-known/dns-query --upstream https://1.0.0.1/.well-known/dns-query
pi 28268 0.0 0.0 4372 548 pts/0 S+ 21:21 0:00 grep --color=auto dns
Now, let’s setup cloudflared as a system service. The file sudo nano /etc/systemd/system/dnsproxy.service should look as follow (make sure to adjust paths accordingly to your setup):
[Unit]
Description=CloudFlare DNS over HTTPS Proxy
Wants=network-online.target
After=network.target network-online.target

[Service]
ExecStart=/home/pi/argo-tunnel/cloudflared proxy-dns --port 54 --upstream https://1.1.1.1/.well-known/dns-query --upstream https://1.0.0.1/.well-known/dns-query Restart=on-abort

[Install]
WantedBy=multi-user.target
Final step is to set cloudflared on system startup: sudo systemctl enable dnsproxy.service
Installing and setting up the Pi-Hole
Installing Pi-hole is very simple. Just run the following:
curl -sSL https://install.pi-hole.net | sudo bash
The setup is going to prompt you for various settings. Accept the defaults and feel free to use any DNS servers (for example Google’s DNS) as we are going to change these later. Now, we need to make few changes. The first is to edit a config file and remove the two instances of server . Run: sudo nano /etc/dnsmasq.d/01-pihole.conf and comment out both #server=1.1.1.1 and #server=1.0.0.1 so you can create new line with our new DNS server server=127.0.0.1#54 below.
Now, edit sudo nano /etc/pihole/setupVars.confand comment out 2 DNS addresses #PIHOLE_DNS_1=1.1.1.1 and #PIHOLE_DNS_2=1.0.0.1 . After that, restart the system sudo reboot . Once system is up and running, the Pi-hole should now be sending DNS requests to Cloudflare over a DoH proxy.
Configuring devices to use new DNS server (Pi-hole)
The last thing to do it to set your gateway to use Pi-hole as the main DNS server. This will depend on what firewall / router you are using at home. In my case, it’s dead simple with Ubiquiti:
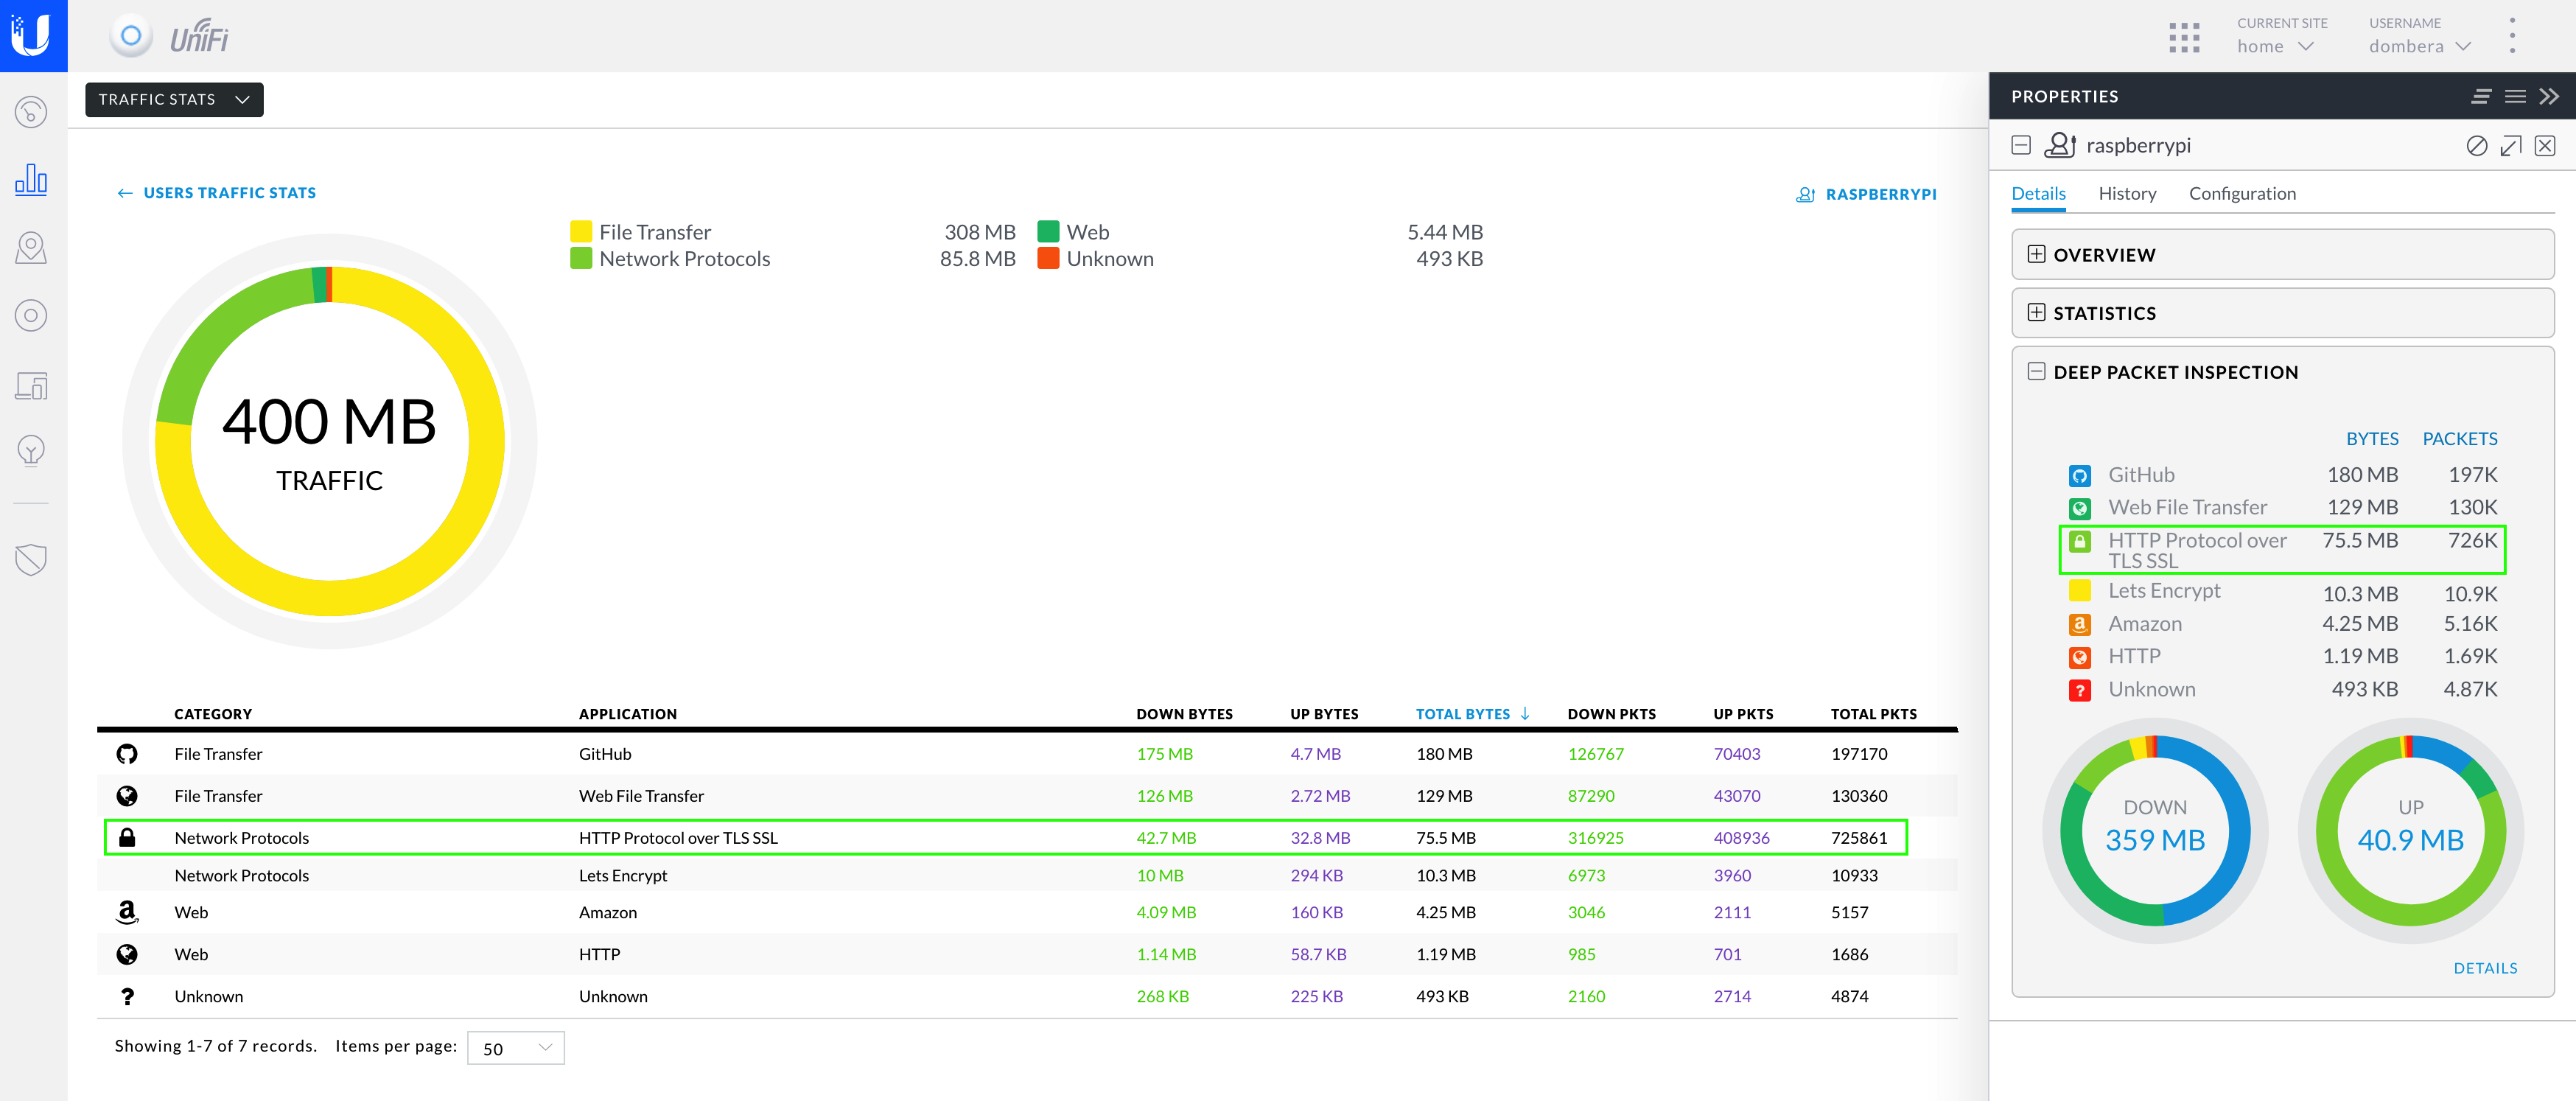
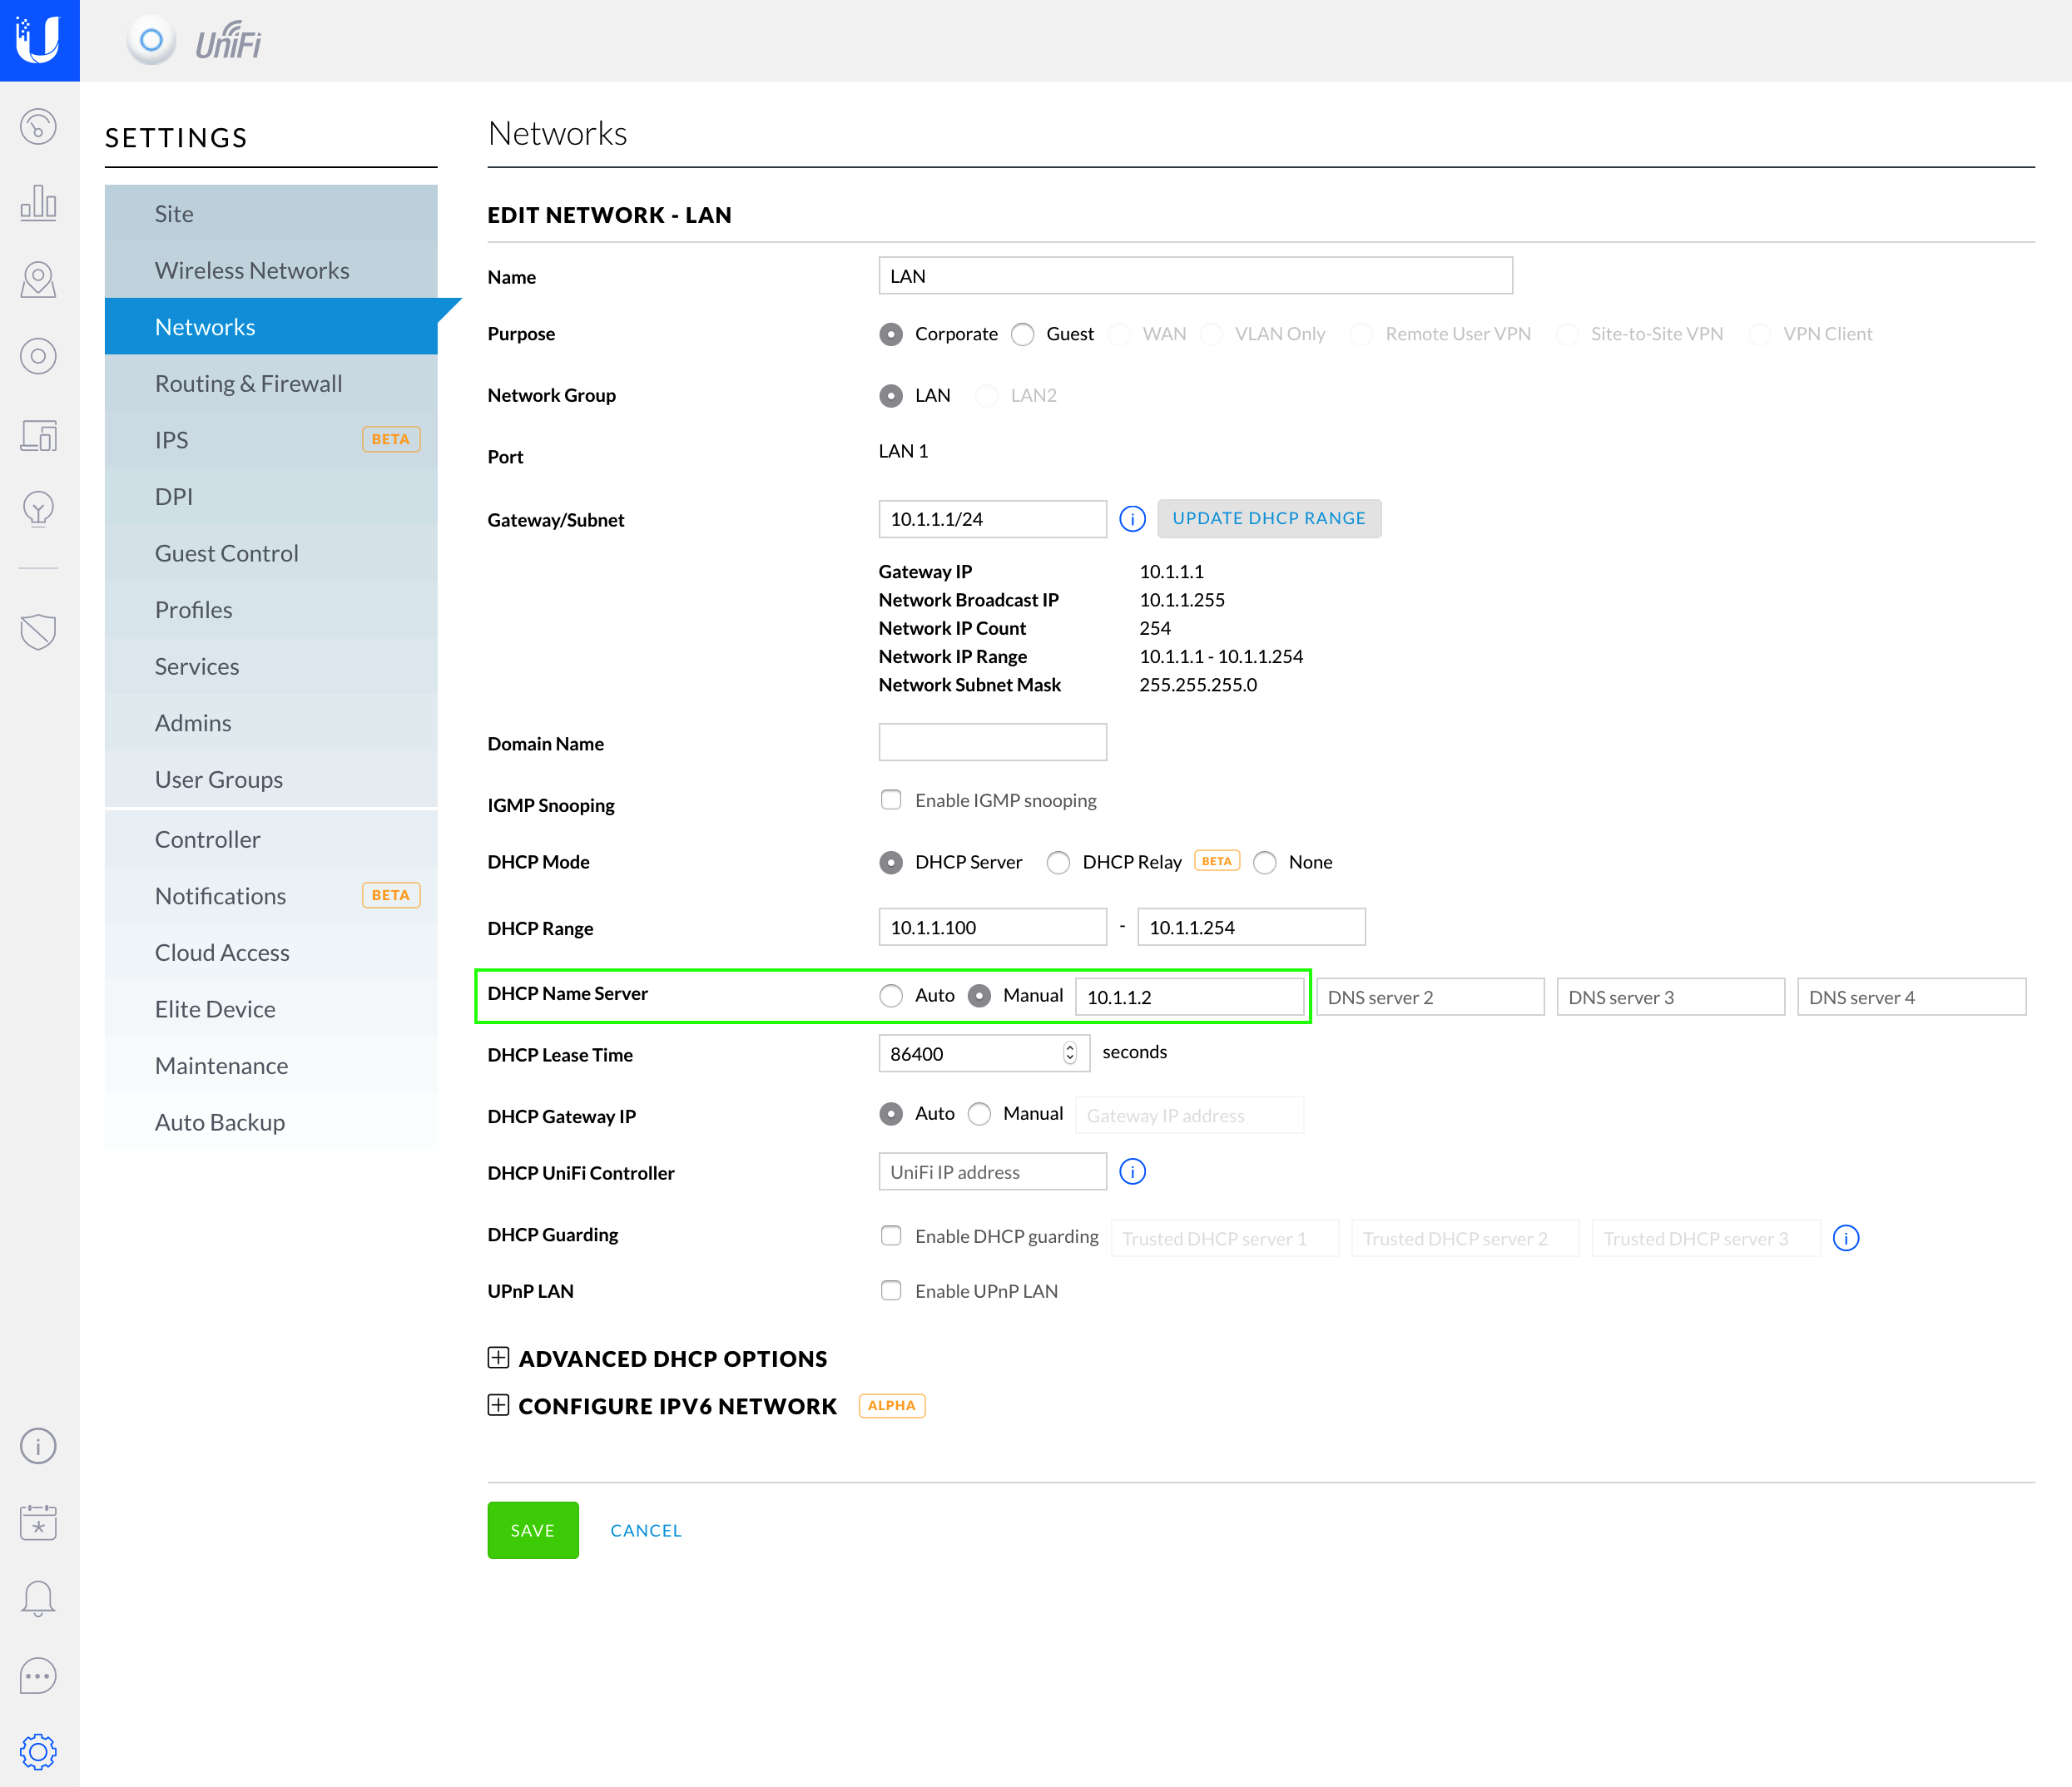 After that, every client on your network will be using new DNS server (Pi-hole). Most clients (both wires and wireless) are likely to pick up the new DNS server after a restart. Pi-hole management interface is really good. After few days of use, you should be able to see that there is no DNS traffic leaving your Pi-hole server (Raspberry Pi), and that DNS is indeed resolving over HTTPS:
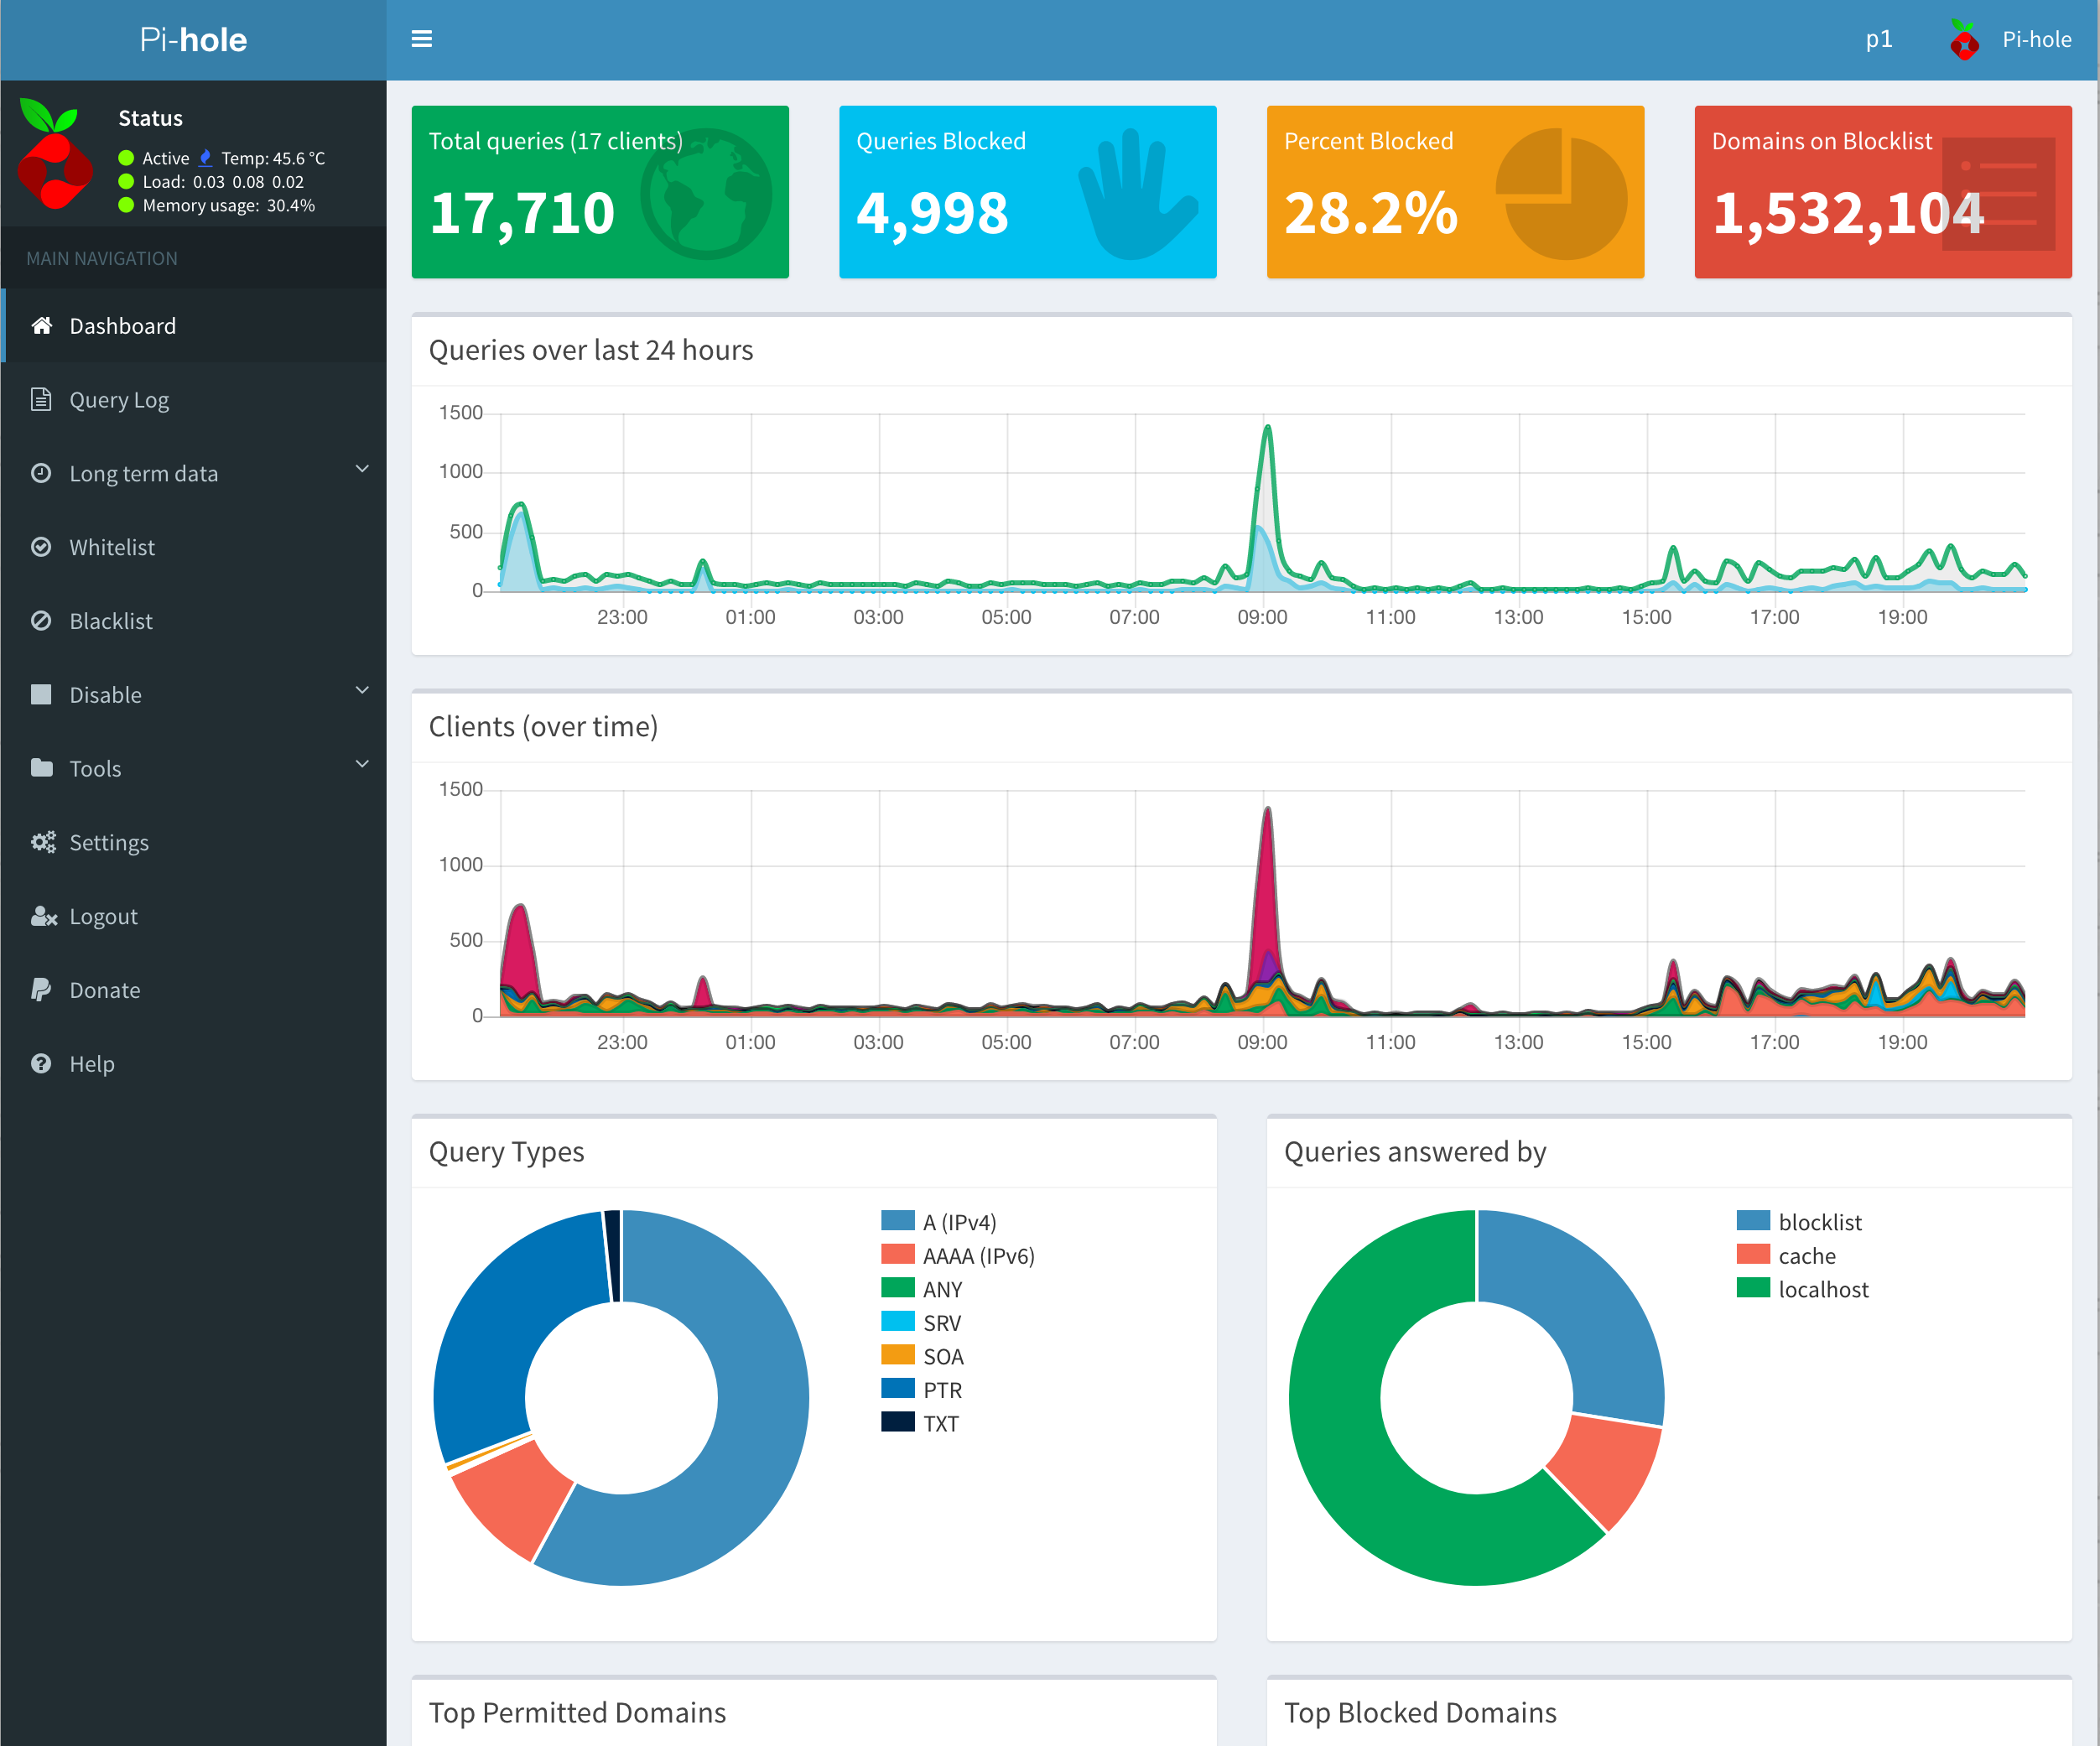
Now, let’s take a look at the Pi-hole Dashboard. It’s absolutely stunning and provides the great amount of insight into amount of DNS requests, how many are blocked (ads, adverts, domains known for malware, etc). You can also very easily see the top blocked and allowed DNS requests, blacklist/whitelist them. I love pretty dashboards, here is Pi-hole in it’s glory:
Pi-hole SSL certificate
While I do not expose my server externally, I like using HTTPS where possible, even on my internal network. I have generated a CSR with OpenSSL: openssl req -out server.csr -new -newkey rsa:2048 -nodes -keyout server.key. Once done I’ve gone ahead and purchased SSL certificate from Namecheap. When everything is ready, we need to create the config file for the HTTPS version of the site: sudo nano /etc/lighttpd/external.conf . The file should look like as follows:
$HTTP["host"] == "p1.1db2.com" {
 # Ensure the Pi-hole Block Page knows that this is not a blocked domain setenv.add-environment = ("fqdn" => "true")

 # Enable the SSL engine with an SSL cert, only for this specific host
 $SERVER["socket"] == ":443" { ssl.engine = "enable"
  ssl.pemfile = "/etc/ssl/p1/conf.pem"
  ssl.ca-file = "/etc/ssl/p1/intermediate.pem"
  ssl.honor-cipher-order = "enable" ssl.cipher-list = "EECDH+AESGCM:EDH+AESGCM:AES256+EECDH:AES256+EDH"
  ssl.use-compression = "disable"
  ssl.use-sslv2 = "disable"
  ssl.use-sslv3 = "disable"
 }

 # Redirect HTTP to HTTPS $HTTP
 ["scheme"] == "http" {
  $HTTP["host"] =~ ".*" {
   url.redirect = (".*" => "https://%0$0")
   }
  }
 }
You need to update the first line to match your own hostname and create the two files reference as per lines ssl.pemfile and ssl.ca-file. The first one needs to contain the certificate and private key file and the second needs to contain the intermediate certificate. You also need to modify your /etc/hosts file to contain your FQDN, in my case: 10.1.1.2 p1.1db2.com . With everything in place, you can restart the lighttpd service with sudo service lighttpd restart .
If everything went ok, you should be able to navigate to the Pi-Hole interface over a secure HTTPS connection.
Keeping everything up to date
Pi-hole updates blacklists automatically so you don’t need to think about it.
I have three aliases, one updates Raspbian itself, second is for updating Pi-hole and third one updates Cloudflared:
alias up='sudo apt-get update && sudo apt-get upgrade -y && sudo apt-get autoremove && sudo apt-get autoclean'
alias pi='sudo pihole -up'
alias cf='sudo ./argo-tunnel/cloudflared update'
Please note: Pi-hole core update will revert DNS server settings to default so you will need to do the following to fix it:
– edit /etc/dnsmasq.d/01-pihole.conf and add the following line at the bottom:
server=127.0.0.1#54
– edit /etc/pihole/setupVars.conf and comment out the following so it looks like that:
#PIHOLE_DNS_1=
#PIHOLE_DNS_2=
After saving the changes in the two files above, simply reboot your Pi-hole server.
Closing thoughts
Was it worth it? Absolutely! As you can see from the screenshot above, amount of DNS queries Pi-hole blocked so far is 28.2%, this is huge. I have gained very interesting insights into my network devices, for example, my Samsung Smart TV was very noisy calling various Samsung (among other) domains frequently.
Overall, I am very happy with the results. Pi-hole and DoH is a fairly easy solution that gives me the following:
– a privacy of my DNS queries utilising HTTPS
– a great visibility into my DNS requests and what my devices (laptops, desktops, mobiles, IoT, etc) are attempting to communicate with
– an ability to blacklist/whitelist domains based on DNS requests
– protection from ads on all my network devices without the need of installing browser based ad-blockers, some of which, have been known for doing very nasty things
– increased loading time of web pages resulting on overall responsiveness
– some savings on the internet bandwidth
There were few domains I’ve had to whitelist in order to resolve connectivity issues, such as:
– analytics.google.com
– analytics.twitter.com
– audio-fac.spotify.com
– graph.facebook.com (my wife uses Facebook, I don’t have an account)
– ocsp.apple.com
– privateinternetaccess.com
– settings-win.data.microsoft.com
I was surprised to see some of the above domains blocked by default but this may have something to do with the additional blacklists I’ve installed on my Pi-hole.
Thank you to both Cloudflare and Pi-hole. If you are enjoying Pi-hole, please donate. These folks are doing a superb job.